
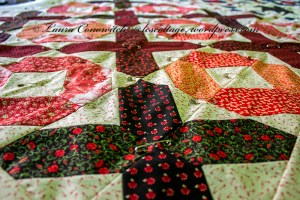
Hello Luv all pin-basted and ready to quilt:
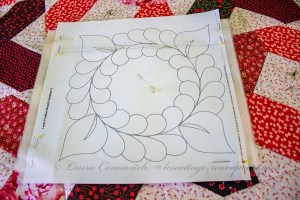
For this quilt, I chose to print a couple of quilting designs from Electric Quilt. I like to cut out enough blocks of tracing paper to equal the blocks on the quilt.
With the design on top, I have the layers of paper stapled or pinned together.
I free motion quilt with a large, old needle and no thread in the sewing machine.
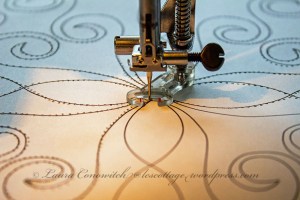
After I peel apart the papers, I pin them to the quilt top, thread up the machine and free motion quilt the design.

I use tracing paper and it peels off easily.

I admit that I wanted to get this project done, so I didn’t think through the rest of the quilting.
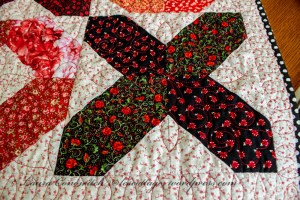
I am not happy with how I finished the border. Finished is better than perfect, but I could’ve done better; I was in a hurry to be done.
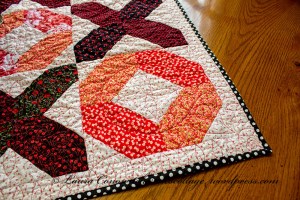
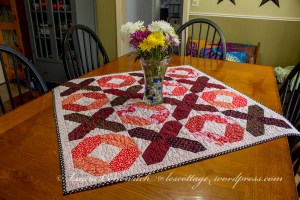
Even so, I have a nice seasonal table topper for Valentine’s Day.
And really good news!
Betty Boop is home from the hospital! She helped me finish this project, and there are a couple of applique projects waiting just for her. It is wonderful to have a sewing machine back that can do zig-zag and decorative stitches!
Quilt On!


Done is good! Congrats on getting your machine back. That was a crazy long time to wait for parts.
LikeLiked by 1 person
I think it was 7 months! Ridiculous! It set a few projects back, including one that I wanted done for a Christmas gift; looks like it will be a birthday gift instead. 🙂
LikeLike
I think it looks beautiful, and now you can enjoy it all of February!
LikeLiked by 1 person
Thank you, Kathy. Unbelievable that I have finished something in the appropriate season! Ha, ha! 🙂
LikeLiked by 1 person
I hear ya!
LikeLiked by 1 person
Great finish, thanks for sharing your process of pattern transfer, I’ll try that next time 🙂
LikeLiked by 1 person
You are welcome, Margaret! I have used this pattern transfer for years; hope it works for you! 🙂
LikeLike
Neat on the design from EQ and then us it for a pattern! Glad your machine is back, you are the patient one. I love the binding! Really adds to the finished product! Have a great Sunday! Hugs
LikeLiked by 1 person
Thanks, Nanette. I forgot to share a pic of the back; it is a pink print, and the binding does look great with it. You have a great Sunday as well! 🙂
LikeLike
Great finish! That’s a clever trick for the quilting, thanks for sharing that. I love the binding!
LikeLiked by 1 person
You are welcome, Wendy! Yes…I will be sad when I use up all of that dot fabric, but I still have quite a bit left! 🙂
LikeLiked by 1 person
The quilting pattern you selected to perfect! Accentuates its beauty even more!
LikeLiked by 1 person
Generous of you to say so! Thank you! 🙂
LikeLike
YaY! Done! And lookin’ good! I know what you mean though about feeling like it was ‘hurry up and rush’ to get it done – sometimes when I get to that point, I really do need to stop and smell the roses a bit then get back to ‘hurrying up’.
Easier said than done – but then you **are** done, now, aren’t you?
🙂
LikeLike
Thank you, Laura! Yup…I am okay with it; I am glad that it is done, but I according to standards that I set for myself…I should’ve taken more care with it. Then again…I don’t care enough to spend time with Jack. Done, done, and done! Ha, ha! 🙂
LikeLiked by 1 person
It’s amazing how we learn to weigh in on our high standards vs time with Jack (in the case of quilting) and feel comfortable with our mindful decisions on our projects. I think, Laura, you and I as Lauras (just a fun thing to point out) have finally gotten that part of the creative life down pat…via the wisdom of long experience!!!!
🙂
LikeLiked by 1 person
Love it, Laura! Quilting is just right for the design.
LikeLike
Thank you so much for the kind words, Judy! I’m happy with all of the quilting but the border. I am okay with that, but not excited about it. 🙂
LikeLike
You did so great quilting this. I love what you did. So good to hear Betty Boop is back but she was gone way too long!
LikeLike
Thank you, Kathleen! No one could be happier than I am to have Betty Boop home! She and I have some fun stuff to catch up on! 🙂
LikeLike
Hi Laura!! BB is back?!! Woohoo. No comment on how long it took – we love to celebrate the positives. I hope you might consider (did I set that up correctly, or do I need a few please, pleases in there?) a tutorial for this. I am fascinated with this process. First of all – I’ve never printed out a quilting design from EQ8. What?!!!!! Even if the design is bigger than your printer paper, it still can be taped or stapled together?! Then, I think you layer the printed design with several of pieces of tracing paper – transfer the design to all of them at one time, stitching without thread, and then layout the tracing paper where you want and pin in place. NICE!! I have to try this sometime sooner than later! {{Hugs}} a bunch. ~smile~ Roseanne
LikeLike
You have it correct, Roseanne. Choose a design in EQ, choose the size to print (and you may have to tape sheets together, depending upon the size you choose) and print. I cut tracing paper (as many sheets as I need) because it tears easier than copy paper, but that is a 2-edged sword…handle the tracing paper carefully. You can pin, or staple, the layers together, and transfer the design to all sheets at one time. Use a large sized, dull, old needle…large size means bigger holes (easier to see when stitching with thread; easier to remove when finished), without thread for initial transferring of the design. Easy peasy! If you need more info than this, just holler. 🙂
BB was out for 7 months. But I wasn’t counting. Oh no…I wasn’t.
LikeLiked by 1 person
SEVEN months!!! Ugg. I feel your pain but now you can make up for lost time! {{Hugs}}
LikeLiked by 1 person
Beautifully done! …and welcome home Betty Boop! ❤️
LikeLike
Thank you so much, Connie! 🙂
LikeLiked by 1 person
That turned out really cute, even if you don’t like the border quilting. It looks so pretty.
LikeLike
Thank you, Sandy! I do like it; just wish I hadn’t rushed the finish. 🙂
LikeLike
Congratulations on a finish – and one you can put to use straight away too. Thanks for explaining your method for creating a ‘stitched stencil’ (I don’t know how to describe it). I will store that up for future use 🙂
LikeLike
Thank you, Allsion! I hope this stencil method is useful for you some day. 🙂
LikeLike